When it comes to tiling, achieving flawless, professional-looking results depends on more than just selecting beautiful tiles. The tools you use can make a significant difference in the outcome of your project. Many DIY enthusiasts and professionals alike search for the best way to apply tile adhesive for a secure and even finish. If you’ve ever wondered how to get those perfectly set tiles, using the right Adhesive Trowel is a crucial step that should never be overlooked.
Understanding the Importance of the Right Trowel
Selecting the correct trowel for your tile project ensures that the adhesive is evenly distributed, which is essential for both the durability and appearance of your tiled surface. An improper trowel choice can lead to uneven tiles, weak bonds, or even long-term damage. The right trowel not only helps achieve a smooth finish but also saves time and reduces frustration during installation.
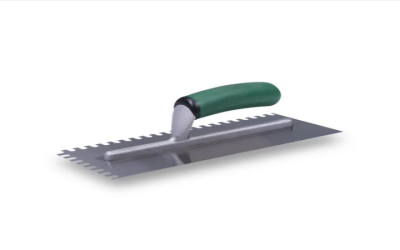
Types of Trowels and Their Uses
There are several types of trowels available, each designed for specific tile sizes and adhesive types. Here’s a quick overview to help you make the right choice:
• V-Notched Trowels: Ideal for small tiles or mosaics. The V-shaped notches create thin, even adhesive lines, perfect for lightweight tiles.
• Square-Notched Trowels: Best suited for medium to large tiles. The square notches provide a thicker layer of adhesive, ensuring better coverage and support.
• U-Notched Trowels: These are commonly used for larger format tiles or when a deep bed of adhesive is required. The rounded notches leave more adhesive on the surface, accommodating uneven substrates.
Each tile project may require a different trowel depending on the tile size, substrate flatness, and adhesive type. Always consult the manufacturer’s recommendations for both the tile and adhesive to determine the appropriate trowel notch size and shape. When it comes to tiling, achieving flawless, professional-looking results depends on more than just selecting beautiful tiles. The tools you use can make a significant difference in the outcome of your project. Many DIY enthusiasts and professionals alike search for the best way to apply tile adhesive for a secure and even finish. If you’ve ever wondered how to get those perfectly set tiles, using the right Adhesive Trowel is a crucial step that should never be overlooked.
How to Choose the Right Notch Size
The notch size of your trowel directly affects the amount of adhesive applied. Here are a few tips for matching notch size to your tile:
1. Small tiles (up to 4 inches): Use a 1/4″ x 1/4″ square or V-notched trowel.
2. Medium tiles (4 to 8 inches): Opt for a 1/4″ x 3/8″ square-notched trowel.
3. Large tiles (over 8 inches): Choose a 1/2″ x 1/2″ square-notched or U-notched trowel.
Using the correct notch size ensures full coverage, which is vital for preventing tile movement and ensuring a strong bond.
Tips for Achieving a Smooth Finish
• Hold the trowel at a 45-degree angle to maintain consistent adhesive depth.
• Comb the adhesive in straight lines rather than swirls, which helps eliminate air pockets.
• Check coverage regularly by lifting a tile to ensure the adhesive covers at least 80-100% of the back.
• Clean your trowel frequently to prevent dried adhesive from affecting the application.
Elevate Your Tile Projects with the Right Tools
By paying close attention to your choice of trowel, you can transform the quality and longevity of your tile installations. The right adhesive trowel helps you achieve a level, secure, and visually appealing finish, whether you’re working on a bathroom backsplash or a large floor area. Remember, taking the time to select the correct trowel for your specific project needs will make all the difference in achieving smooth, lasting results that you can be proud of.